Who doesn’t like a good tale of a system administrator screwing up production, right? Well, this is the story of how I screwed up our SolusVM KVM Slave due to a silly mistake.
The company I’m working at runs a few Dell servers on-premise, specifically in a server room in the office. Honestly I don’t really think it’s a good idea, but I’m not the one making the decisions. We use SolusVM to manage the virtual machines, specifically there is a management node (where the control panel is installed), and three KVM slave nodes that actually hosts the virtual machines (we call them node 1 – 3). Each VM will have their own virtual hard disk in the form of LVM Logical Volume.
Node 3 has the following partition layout (more or less, I don’t remember):
/dev/sda
|_ /dev/sda1 - EFI System Partition
|_ /dev/sda2 - /boot? I think
|_ /dev/sda3 - Physical volume for cs_server3 volume group, where SolusVM is installed
|__ /dev/cs_server3/cs_server3-root - filesystem root (/)
|__ /dev/cs_server3/cs_server3-swap - swap space
|_ /dev/sda4 - Physical volume for vg0 volume group, contains a bunch of logical volumes, 1 per VM
|__ /dev/vg0/kvm1 - Logical volume for VM 1, etc
One of our customer wants to migrate from a VPS to a dedicated server. Lo and behold, the new server arrived and we put it inside of the server rack. The next step is to migrate the VPS into the new server. How are we going to do that?
Here’s the plan:
- Stop the virtual machine.
- Create an image of the VM’s hard disk using dd
- Write the image into the new server’s hard disk using dd
- Boot the new server, reconfigure if necessary
Look, I’m not an expert in server migration but it does sound like a good plan, and it was even agreed upon by my boss. Here’s the problem: Node 3 has run out of storage, we cannot create the VHD image locally.
Solution? dd and pipe into SSH on the new server. There are two ways to do this:
Method 1: dd from node 3, pipe into an SSH connection to the new server, the SSH connection will output it into a file (outbound)
dd if=/dev/vg0/kvm1 | ssh root@newserver "dd of=/backup/vm.img status=progress"
This command makes sense, however we are going to overwrite the whole hard disk in the next step, so the file will get nuked in the process.
Method 2: SSH into node 3, dd the LV, pipe the output into a file (inbound)
ssh root@node3 "dd if=/dev/vg0/kvm1" | dd of=/backup/vm.img status=progress
However, dd took a very long time because the LV was around 150GB. Not only that, we cannot just dd into a live system. So here’s what we did:
- Plug in a Ubuntu installer into the new server, and boot into it because the installer also comes with an SSH client/server.
- Instead of piping it into a file, and then dd-ing into the new server, we (*cough* I *cough*) decided to dd it directly into /dev/sda of the new server. The command should look like this (running from the ubuntu installer shell):
ssh root@node3 "dd if=/dev/vg0/kvm1" | dd of=/dev/sda status=progress
Looks good, right? This is what I wrote instead:
ssh root@node3 "dd if=/dev/vg0/kvm1 of=/dev/sda status=progress"
See how the if and of parameter are in the same quotes instead of separated by a pipe? That means I’m SSH-ing into node 3, read /dev/vg0/kvm1 byte by byte, and writing it into /dev/sda.
Yep, this is where I fucked up. Fortunately, I noticed it early and pressed CTRL+C. I called my colleague, and admitted I fucked up and we began to formulate a recovery plan. I started to panic, but I remained calm. I started by running some basic commands to ensure the system still works. I started with virsh to check if the VMs are still running, and I was greeted with a segmentation fault. Other commands either give me segmentation fault or exec format error because they have been overwritten by dd, even common ones like yum, dnf, wget and curl. That’s when I knew this was going to be difficult.
Since dd writes linearly (starting from the first byte), I know we had to rescue the partition table first. I loaded /dev/sda into fdisk (I had to, gdisk was not available) and was greeted with this prompt (not my image):
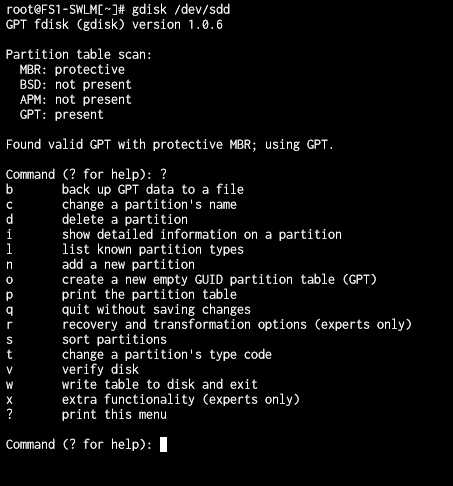
Fortunately the server uses GUID Partition Table (GPT), which has built-in redundancy. So I was able to restore the partition table from the backup. Select the recovery option from the menu (r command) and then (I forgot which option I chose in the recovery menu, but probably b, c).
Verify that the partitions are intact by running the p command in fdisk and phew, we managed to rescue the partition table. Now what? We began creating a list of files & directories that are deemed important for the restore process later. Some of them are:
- /etc/lvm – metadata backup for LVM’s PV, VG and LV
- /home – user home directories (specifically /home/solusvm, but we found out later that it was not really important)
- /usr/local/solusvm – SolusVM data directory
- /usr/local/svmstack – the software stack used to run SolusVM (not really important)
- /etc/sysconfig/network-scripts – network interface configurations
Rsync, scp, tar, zip, and even python were broken, so how are we going to rescue these files? Static binaries to the rescue! I downloaded a static binary of busybox, curl, miniserve and some other stuff, put it into a USB stick, and inserted it into the server. I was very lucky that external drives could still be mounted. I archived the files above using busybox’s tar applet, and then launched miniserve so I could download the files via HTTP.
We were still dealing with a lot of uncertainties at the time because a lot of shit could not be run on the server, and we needed to enter recovery mode ASAP. One problem was we were unsure whether the partitions will still show up upon reboot, but this was the only option we had, so into recovery mode we go.
BOOM! It worked! The partitions were still there, LVM PV, VG and LV were intact, except one volume group which I could not recover even after hours of effort, but that was not really important since we had already created a backup of the important stuff from previously. I formatted /dev/sda{1,2,3}, and repartitioned it according this layout: (insert partition layout here because I forgot how it looks like)
To cut the story short, we faced a few hurdles, but nothing serious. We reinstalled Centos Stream 8 on the new partitions and rebooted. (Pro tip: if you want to install a SolusVM KVM Slave, pick the “minimal install” option on the installer, otherwise you will encounter dependency issues later on)
It was around 9am at the time, and our clients started to scream in our WhatsApp group. We had to be quick and downloaded the installer according to the SolusVM installation docs. After the installation had completed, we were greeted with a Node ID and password for the SolusVM slave, which had to be entered in the management panel to connect the two servers. But how are we going to “tell” the management server that this slave node actually has old VMs inside it? We had no idea, but my colleague had a plan.
Remember the backup we had? It was practically useless but one file, namely /usr/local/solusvm/data/solusvm.conf. This file contains the node ID and password delimited by a “:”. We copied over the old file into the new server, and refreshed the management panel. All VM’s showed up. Hurray! Now we only need to boot them one by one.
Moral of the story?
We could have avoided the whole situation by writing the disk image into an external disk, and plug the disk into the new server.